Fermi Surface Calculation
This page explains how to calculate the Fermi surface for metallic copper (Cu) lying in its equilibrium face-centred cubic (fcc) Bravais Lattice, through the use of Density Functional Theory. We will use Quantum ESPRESSO as our simulation engine for this tutorial.
Quantum ESPRESSO version considered in this tutorial
The present tutorial is written for Quantum ESPRESSO at versions 5.2.1, 5.4.0, 6.0.0 or 6.3.
Create Job and Select Material
The user should start by creating a new Job, through opening the Job Designer Interface. The fcc crystal structure of copper should then be selected and added to the new Job being designed, assuming that this structure is already present among the entries listed in the account-owned collection of materials.
Choose Workflow
Workflows for calculating the band structure of materials with Quantum ESPRESSO can readily be imported from the Workflows Bank into the account-owned collection. This workflow can later be selected and added to the Job being created.
Set Sampling in Reciprocal Space
It is critical to have a high k-point density in order to resolve enough details for the Fermi surface plot.
The band structure workflow is composed of two units. The first unit specifies the settings for the self-consistent calculation of the energy eigenvalues and wave functions. The second unit calculation is a non self-consistent calculation using the wave functions and charge density of the previous calculation.
We set the size of the grid of k-points to 18 x 18 x 18 in the first workflow unit. This provides a dense enough k-point sampling in order to resolve the fine features present within the output of the band structure computation. The validity of this choice of k-grid size for yielding accurate results of order meV in the final energy can be verified by performing the relevant convergence study.
Submit Job
Before submitting the job, the user should click on the "Compute" tab of Job Designer and examine the compute parameters included therein. Copper is a small structure, so 4 CPUs and 1 minute of calculation runtime should be sufficient.
Examine Final Results
When both unit computations are complete at the end of Job execution, switching to the Results tab of Job Viewer will show the final total energy, the Fermi energy, and more information about each execution unit.
The user can also browse the actual input and output files that are part of the calculation under the Files Tab of Job Viewer.
Generate File with Fermi Surface Information
Once the simulation is complete, the user should open a Web Terminal session in order to create a file that is essential for visualizing the Fermi surface. The calculation of Fermi surface can in general be performed using the fs.x code, part of the Quantum ESPRESSO distribution. The resulting file in .bxsf format can then be read and plotted using the XCrySDen analysis and visualization software.
In order to generate the post-processing bxsf file, the user should first navigate from within the Command Line Interface into the working directory containing the simulation input and output files. Once in this directory, a new input file with the following contents should be written using any command-line text editor (for example nano). This new file should be given the name fs.in at the moment of saving:
1 2 3 4 | &fermi outdir='./outdir' prefix='__prefix__' / |
Afterwards, the following commands should be entered, first for loading the appropriate Quantum ESPRESSO module under the Command Line Interface environment, and then for running the fs.x executable on the previously-created fs.in file:
1 2 | module load espresso/540-i-174-impi-044 fs.x < fs.in |
After the end of the execution of the above commands, the user will notice a new file that has been created in the current working directory called __prefix__fs.bxsf. We shall use this file for the ensuing visualization of the Fermi surface with XCrySDen.
Finally, the user should close the Web Terminal session to return to the original Web Interface of our platform.
Visualize Fermi Surface
The next step is to open a Remote Desktop Connection, so that graphical interface programs for visualization purposes can be run.
The user should now find and open the XCrySDen application.
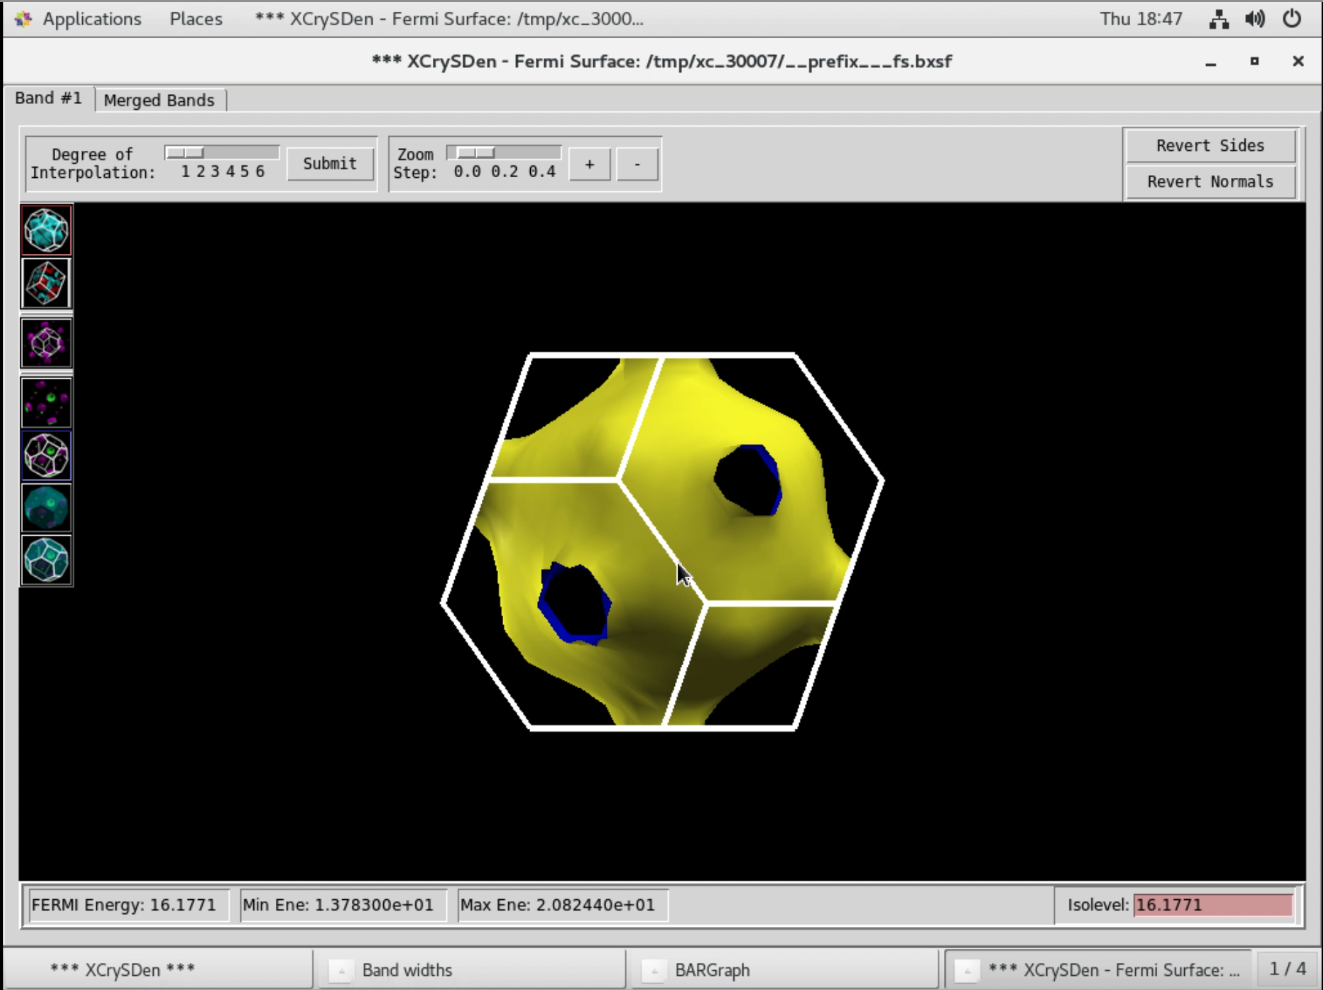
Within XCrysden, the user should go to File -> Open Structure -> Open BXSF, and then navigate to the directory where the aforementioned __prefix__fs.bxsf file was created. This opens a graphical visualization of the Fermi surface, as portrayed in the example screenshot below.

Animation
We demonstrate the above-mentioned steps involved in the creation, execution and visualization of a Fermi Surface calculation on crystalline copper, using the Quantum ESPRESSO simulation engine, in the following animation.